Posts: 444
Threads: 19
Joined: 2016 Feb
Thanks: 0
Given 42 thank(s) in 39 post(s)
Country: 
2018-02-01, 09:48 PM
(This post was last modified: 2018-02-05, 07:26 PM by BronzeTitan.
Edit Reason: grammar
)
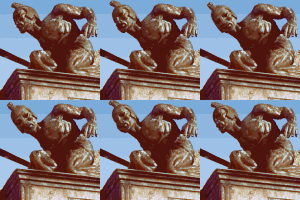
I tried the point-to-point color correction approach by starting with the original artwork, . .
. . and overlaying the HD-TV (Judgment) screencap, . .
. . and selecting a variety of color points to sample (shown here only with the background pictures were dimmed, for easier visualization) . .
The sample R-G-B values from both pictures were then entered into a paint program's Curves function . .
When I saw these graphs (and the resulting HD-TV adjustment) I knew there was a problem. When near-by colors jump around like this, it's always a clue that the newer source was digitally manipulated (an HSL Wheel/ Scope/whatever) rather than analogically adjusted. Segments of the spectrum were independently changed in different directions.
So the Curves technique, by itself, failed do the job of color correction. Just to continue the test, I manually pulled the those points, outside of the general curve swing, closer inwards. That removed psychedelic "color patches" in the picture but colors were still notably off (too strong, wrong hues, and such).
Continuing with the test, I added the HSL Wheel adjustment to it. That easily brought errant colors back into line -- not perfectly, but closer to a representative of the original artwork.
So scrapping the point-to-point Curves as the main approach, I'll use the HSL Wheel. Stay tuned. 
Posts: 1,206
Threads: 28
Joined: 2015 Jan
Thanks: 828
Given 372 thank(s) in 241 post(s)
2018-02-02, 01:10 AM
(This post was last modified: 2018-02-02, 01:11 AM by CSchmidlapp.)
A project to return GITS to it's original cell colour's may make you promoted to a much denser metal that bronze.
And I mean able to crush Wolverine's skeleton just with the faintest of glances.
That original cell background is gorgeous, and makes me a little sad that there may never be a scan and release possible, to capture a higher resolution than we already have. Although I have seen magic around these parts.
Can not wait to follow your progress good sir.
Posts: 444
Threads: 19
Joined: 2016 Feb
Thanks: 0
Given 42 thank(s) in 39 post(s)
Country:
2018-02-02, 03:14 AM
(This post was last modified: 2018-02-05, 07:34 PM by BronzeTitan.
Edit Reason: grammar
)
Posts: 444
Threads: 19
Joined: 2016 Feb
Thanks: 0
Given 42 thank(s) in 39 post(s)
Country:
2018-02-04, 10:10 PM
(This post was last modified: 2018-02-05, 08:01 PM by BronzeTitan.
Edit Reason: grammar
)
As a hot-shot space-pilot once said, "Sometimes I amaze even myself."
True, I expected this correction to look, you know, "correct". But I wasn't ready for Ghost In The Shell's transformation from nice cartoon to gritty realism. In a word ... AWESOME !
One caveat here is that, to produce a really good looking picture, I gently denoised & sharpened HDTV-Judgment as demonstrated earlier in this thread. This is a legitimate procedure to prevent color-correction from emphasizing the noise, too. So, let's go for the gold !
Use the original artwork as a background, . .
. . and resize/align HD-TV (Judgment) . .
. . as a layer . .
STEP 1
Notice the brightness differences -- the darks are too light and the lights aren't light enough. This is a job best suited to Histogram because it keeps a smooth, general adjustment of HDTV-J when matching the overall brightness levels to the artwork.
The stone foundation needs darkening, but the only way to do it without crushing even darker areas is to increase the contrast in Midtone: expand.
The sky is another matter. It's Red is notably higher than both the Green and Blue (from using an eyedropper to read those values). As Red would be decreased later on, it should be ignored at this stage. A brightness match should be relative only between the Greens and Blues. Therefore High is reduced to pull the spectrum up. The sky, then, still looks brighter because Red is higher, but the critical Green and Blue are matched to the artwork, which is what we want.
The greys of the shadowed buildings are lowered by reducing Gamma.
Do a little back and forth to balance anything affected by the other adjustments, and then that part is done. Values to achieve this (apart from the defaults) are highlighted in yellow . .
STEP 2
Once properly prepped, the main adjustment is with the HSL Wheel, to move all the colors back to where they belong as per the artwork's spectrum. Adjustment for each primary and secondary color-wheel will follow the same procedure.
Temporarily max the Saturation to see where HDTV-J is affected. Then, starting at the default, vary the Hue, Saturation, and Lightness to see where that color area goes, to roughly match that of the artwork. Move on to the next color-wheel. When the 1st pass is finished, repeat the procedure in case colors are not smoothing into their neighbors. Compromise where necessary but bring everything as close to "best look" as possible. Then that's done. Again, values to achieve this (apart from the defaults) are highlighted in yellow . .
STEP 3
At this stage, you will notice some areas that look slightly different -- shadows a shade off in certain areas; color objectss still a little too tinted red, green, or blue. That's where Curves come in to make those touch-ups.
Closely compare HDTV-J to the artwork, check them with an eyedropper, put a point to the appropriate value on the graph, and gently adjust it's change. That may also require restoring the the curve elsewhere with "anchor" points further up and/or down the graph, for those areas to remain unaltered. The RGB Curve affects the general brightness, and the individual R-G-B Curves affects the hues.
As can be seen, the graphs' lines are just a little pushed and nudged here and there. Nothing drastic. Then that's done. Values to achieve this (apart from the defaults) are imprinted , with additional ▲/▼/ ● characters to denote increases/ decreases/ default-anchors . .
If the corrected layer is toggled off and on, it should match really close. More could be done with tighter ranges on more HSL Wheels but this is where the paint program stops.
Here is the "before", as on Judgment's website, earlier mentioned in this thread (open the picture in a new tab to see it full-sized) . .
. . and here is the "after" to match the original artwork (open the picture in a new tab to see it full-sized) . .
![[Image: GITS_HDTV-art_cc_2_HDTV_after_1040p.png]](https://s10.postimg.cc/c7mo9frqv/GITS_HDTV-art_cc_2_HDTV_after_1040p.png)
Posts: 7,151
Threads: 601
Joined: 2015 Jan
Thanks: 1081
Given 1505 thank(s) in 969 post(s)
Country: 
That's very good! Is there a way to apply the setting to the whole movie? (if, of course, a single setting would fit well)
Posts: 465
Threads: 30
Joined: 2015 May
Thanks: 72
Given 88 thank(s) in 73 post(s)
Country: 
I have to ask. Is there any reason to believe the 'original art' is accurate or as intended?
It seems a lot like Disney using original cells for color timing new transfers.
Posts: 1,206
Threads: 28
Joined: 2015 Jan
Thanks: 828
Given 372 thank(s) in 241 post(s)
2018-02-05, 12:50 AM
(This post was last modified: 2018-02-05, 01:17 AM by CSchmidlapp.)
Posts: 465
Threads: 30
Joined: 2015 May
Thanks: 72
Given 88 thank(s) in 73 post(s)
Country:
2018-02-05, 08:16 AM
(This post was last modified: 2018-02-05, 08:17 AM by Doctor M.)
True.
Disney did Technicolor tests on their art to achieve the colors they intended. I get the idea that the people working on GitS let the technology lead them and really didn't know what they could do with it until they were done.
The original cell/background art probably IS as accurate as any other color choices.
Posts: 444
Threads: 19
Joined: 2016 Feb
Thanks: 0
Given 42 thank(s) in 39 post(s)
Country:
2018-02-05, 08:37 PM
(This post was last modified: 2018-02-05, 08:37 PM by BronzeTitan.)
Posts: 444
Threads: 19
Joined: 2016 Feb
Thanks: 0
Given 42 thank(s) in 39 post(s)
Country:
2018-02-06, 01:07 AM
(This post was last modified: 2018-02-06, 01:10 AM by BronzeTitan.)
|




![[Image: GITS_HDTV_art_-_x1_orig_art.png]](https://s10.postimg.cc/vdfm0j6ft/GITS_HDTV_art_-_x1_orig_art.png)
![[Image: GITS_HDTV_art_-_x2_HDTV-art_align.png]](https://s10.postimg.cc/agjdvx5ux/GITS_HDTV_art_-_x2_HDTV-art_align.png)
![[Image: GITS_HDTV-art_-_x3_points.png]](https://s10.postimg.cc/jcu5zu9bt/GITS_HDTV-art_-_x3_points.png)
![[Image: GITS_HDTV-art_-_x4_curves_R-_G-_B.png]](https://s10.postimg.cc/9fj56w4bt/GITS_HDTV-art_-_x4_curves_R-_G-_B.png)


![[Image: smiley_sad_anim.gif]](https://s27.postimg.cc/bjyusu58z/smiley_sad_anim.gif)
![[Image: GITS_orig_art_crush_anim.gif]](https://s10.postimg.cc/atok7ruzd/GITS_orig_art_crush_anim.gif)

![[Image: GITS_HDTV-art_-1_orig_art.png]](https://s10.postimg.cc/6pph7wuax/GITS_HDTV-art_-1_orig_art.png)
![[Image: GITS_HDTV-art_-2_HDTV-_J.png]](https://s10.postimg.cc/u5bzr3iw9/GITS_HDTV-art_-2_HDTV-_J.png)
![[Image: GITS_HDTV-art_-3_HDTV_over_art.png]](https://s10.postimg.cc/4mjne4hcp/GITS_HDTV-art_-3_HDTV_over_art.png)
![[Image: GITS_HDTV-art_-4_histogram_result.png]](https://s10.postimg.cc/lztxt0f8p/GITS_HDTV-art_-4_histogram_result.png)
![[Image: GITS_HDTV-art_-5_HSL_result.png]](https://s10.postimg.cc/6ecm93lax/GITS_HDTV-art_-5_HSL_result.png)
![[Image: GITS_HDTV-art_-6_Curves_result.png]](https://s10.postimg.cc/th357yp9l/GITS_HDTV-art_-6_Curves_result.png)
![[Image: GITS_HDTV-art_cc_1_HDTV_before_1040p.png]](https://s10.postimg.cc/kpw4doit3/GITS_HDTV-art_cc_1_HDTV_before_1040p.png)



![[Image: GITS_HDTV-art_cc_2_HDTV_samples_before_after_anim.gif]](https://s10.postimg.cc/okmndyybr/GITS_HDTV-art_cc_2_HDTV_samples_before_after_anim.gif)
